Bengaluru Farmer Grows 1500 Chrysanthemum Bouquets Weekly and Shares Care Tips
Read more
The Better India
thebetterindia.com

Bengaluru Farmer Grows 1500 Chrysanthemum Bouquets Weekly and Shares Care Tips

Chrysanthemums can instantly revitalize a winter garden thanks to their lush blooming. These flowers are available in various shades and forms, and with proper growing conditions, they can thrive indoors.

The chrysanthemum cultivation experience of a farmer based in Bengaluru, Lohith Reddy, provides valuable knowledge on understanding and caring for this flower.

Chrysanthemums bring colors of yellow, white, pink, and red to winter. It is recommended to choose a healthy seedling from a nursery suitable for the local climate, or start with a root cutting.

To grow chrysanthemums on a balcony, terrace, or windowsill, a container with a width of at least 30 centimeters should be used. It is important to ensure that the base of the pot has drainage holes to remove excess water.

When planting, fertile and well-drained compost must be used. The plant needs moisture, but the roots must not be in overly saturated soil; good drainage is critical, especially in damp weather.

Young chrysanthemums require regular watering. The condition of the compost must be checked to prevent complete drying out, but excessive watering or leaving the pot in water must be avoided.

When the young plant reaches a height of about 20 centimeters, the apical shoot should be removed slightly above a pair of leaves. This procedure stimulates the development of side shoots and promotes bushier growth of the plant.

Potted plants should be fed with organic liquid seaweed fertilizer, following the instructions on the label. During flowering, it is recommended to switch to a potassium-rich fertilizer, such as tomato fertilizer, to support blooming.

Farmer Lohith Reddy notes that the chrysanthemum is a light-sensitive crop requiring 17–18 hours of darkness, which is only possible in winter. To control lighting, the farmer uses special nets that help regulate light exposure, which is important due to the flowers' need for long periods of darkness.

To maintain the fresh appearance of the plant and stimulate the appearance of new buds, withered flowers must be regularly removed. When working with cut varieties, removing the central bud can help form a more uniform inflorescence.

Potted chrysanthemums are more susceptible to cold and moisture. They should be placed in a protected area, drainage holes should be cleaned, and standing water in the saucer must never be allowed.

Lohith shares his attitude towards work, saying that he loves spending time among greenery and flowers and could not imagine himself in an enclosed space, as the environment with flowers brings him deep satisfaction.

Similar stories

Bengaluru resident shares method for growing beets in pots, cultivating over 200 plants
Read more
thebetterindia.com

Bengaluru resident shares method for growing beets in pots, cultivating over 200 plants

Swati Dwivedi, a resident of Bengaluru who has been passionate about gardening since childhood, found time to grow plants in her backyard despite working in human resources management.

As many people sought her advice after she grew over 200 plants at home, she launched a YouTube channel in 2017 to create educational videos.

In her videos, she demonstrates the process using store-bought beets, showing how vegetables can be grown at home from seed saving to fresh harvest in a pot. The process begins with the leafy part of the root vegetable.

Swati emphasizes that this method of growing beets requires patience. She notes that although it is a long process, it allows for growing organic vegetables at home and eating healthily.

To start, take one beet purchased from the store and remove the dry leaves. Then, cut off the top half, leaving the stems and leaves untouched. This small piece will be the starting point of your growing process.

Place the cut piece in a bowl or a shallow dish with a small amount of water, but do not submerge it completely to prevent rot. Keep it on the kitchen counter or a windowsill protected from direct sunlight.

Fresh leaves should appear within three to four days. The water needs to be changed every other day. By the fifteenth day, the leaves will be larger and ready for the next stage.

After that, transfer the top part of the beet into a pot filled with organic potting soil and place it in partial shade. Water it well, and then let it grow for another three to four months until flowers appear.

Swati advises collecting these flowers and stems and drying them in the shade for several days. From them, seeds can be obtained, which can be stored until the planting season in winter.

To grow beets, sow the seeds in moist soil, leaving about one inch between them. Cover the seeds with soil and water again. You can use saved seeds or purchase them from a store.

The seeds should germinate within 24 days. Carefully lift the seedlings and transplant them into a larger container or a garden plot, ensuring each young plant has enough space to grow.

Keep the plants in a shaded area, water once a week, and add a light homemade fertilizer after a few weeks. In about 90 days, your home-grown beets will be ready for harvest.

Gardener from Uttarakhand shares experience of growing pineapples in a pot
Read more
thebetterindia.com

Gardener from Uttarakhand shares experience of growing pineapples in a pot

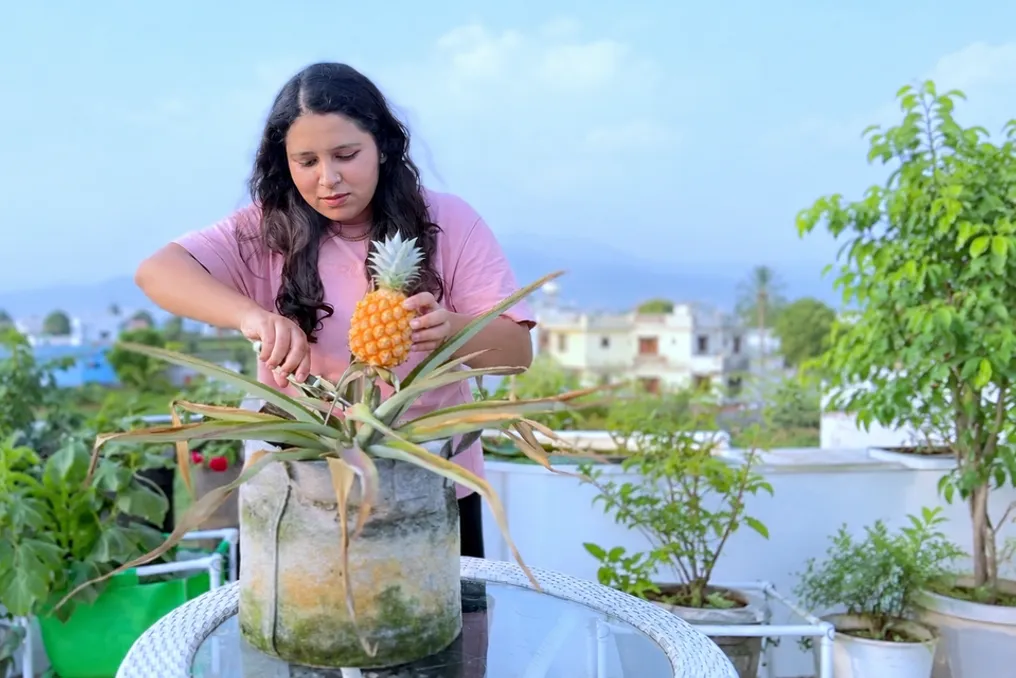
Growing fruit at home requires patience, but the reward can be sweeter than anything sold in the market. Shalini Kapruwan from Uttarakhand experienced this when she tried a pineapple grown on her terrace. After waiting almost two years for it to ripen, she was amazed by its sweetness, juiciness, and rich aroma.

Sharing her gardening journey on Instagram via the account @shalini_kapruwan7, she stated that it was the best pineapple she had ever tasted. She noted: 'I have bought and eaten countless pineapples at the market, but I have never encountered one so sweet, juicy, and intensely aromatic.'

She was particularly delighted by the beautiful golden color and aroma of the fruit. Every time she went out to the terrace, the smell of ripe pineapple was the first thing to greet her.

Two Years of Waiting for a Sweet Reward

The gardener started growing the pineapple plant from the crown of the fruit. This experiment, which began this way, eventually led to the home-grown pineapple being ready for harvest after almost two years.

As she notes, the difference was obvious from the first bite. Unlike many pineapples bought in stores, which are harvested before full ripening on the plant, hers were allowed to ripen naturally. This gave the fruit a softer, juicier texture and an exceptionally sweet taste.

The taste left her wanting to plant more than one plant. In addition to the wonderful harvest, she believes this fruit is excellent for beginner gardeners. The plant is hardy, requires little attention, and can withstand periods without watering, making it relatively easy to grow at home.

How to Grow a Pineapple at Home

Shalini shared several simple tips for those who want to try growing a pineapple:

  • Choose a pot: Use a bag or growing pot measuring 12–15 inches with drainage holes.
  • Prepare the soil: Fill it with a well-draining mixture consisting of 40 percent garden soil, 30 percent compost or vermicompost, and 30 percent coconut fiber. Instead of coconut fiber, you can use coarse sand or perlite.
  • Plant the crown: Take the pineapple's leafy top and plant it so that the base is slightly covered with soil.
  • Ensure sunlight: Place the pot in a location that receives six to eight hours of direct sunlight daily.
  • Water carefully: Water only when the top layer of soil becomes dry. Overwatering should be avoided.

With sufficient sunlight, periodic watering, and some patience, one can eventually enjoy a pineapple grown in their own garden. For Shalini, this wait was definitely worth it. And the main takeaway from this experience? If you plan to grow a pineapple, don't stop at just one plant.

Popular