Old plastic basins, barrels, or containers often go unnoticed in corners of the house, considered useless. However, with a little creativity, these items can significantly improve the appearance of a balcony or garden. Those who enjoy gardening often have to buy pots in stores. If you are tired of spending money on expensive designer pots, this article offers a simple way to create a sturdy and beautiful cement pot yourself using an old plastic basin.
Not many materials are required to create this pot. Below is a detailed guide on how to turn an old plastic basin into a designer pot.
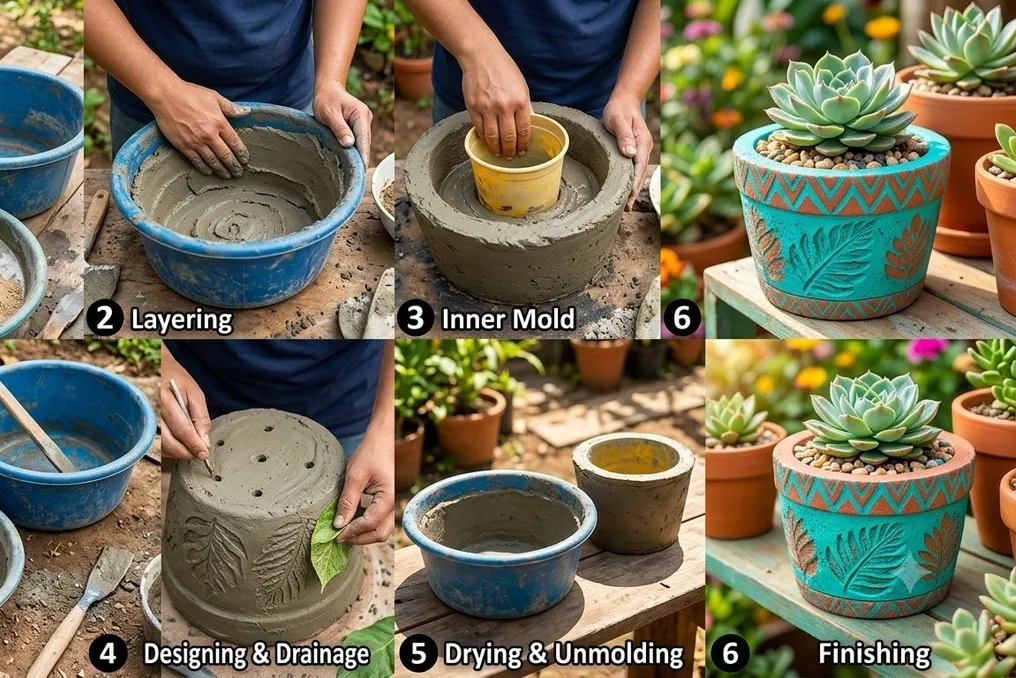
First, you need to thoroughly wash and completely dry the old plastic basin. Then, in a separate container, mix cement with fine sand.
Next, prepare the mixture by gradually adding water. It is important to monitor the consistency: it should not be too runny nor too dry, so that it can be easily spread.
The prepared cement mixture is poured into the basin. It needs to be evenly distributed in a layer about 1.5–2 centimeters thick, both on the bottom and along the side walls. It is recommended to wear rubber gloves while doing this, as strengthening the bottom part of the pot is a critical step.
Then, take a small plastic cup or bowl that fits easily inside the large basin. Apply a little oil to the outer surface of this cup so that it can be easily removed after the cement hardens. This cup is placed in the center of the wet cement and lightly pressed to give the desired shape.
It should be remembered that the inner cup should not be pressed in too deeply; there must be a sufficiently thick cement base at the bottom of the pot.
If you want something other than a standard pot, you can create patterns on the outer layer of the cement before it fully sets, using string, leaves, or other objects. This will give the pot a beautiful texture.
Be sure to provide 2–4 small drainage holes in the bottom of the pot so that excess water can drain out if the plant requires excessive watering. Creating these holes is easiest before the cement has fully hardened.
After this, the finished sample is left undisturbed for at least 24–48 hours. When the cement has hardened well, the inner cup or bowl is carefully removed. After this, the pot needs to dry for several more days.
It is important not to rush planting the plant until the pot is completely dry, as the better the pot stabilizes, the stronger it will be.
When the pot is completely dry, its rough surface can be lightly sanded with sandpaper to achieve smoothness, which also improves paint adhesion. After that, the outer surface of the pot can be painted in your chosen color.
If you aim for a modern look, use one color, whereas for a more attractive look in the garden, you can combine different colors or patterns.